Introduction: The Critical Importance of Proper ESD Flooring Installation
Electrostatic discharge (ESD) flooring serves as the foundation for any effective static control program. However, even high-quality ESD flooring can fail to protect sensitive equipment if installed or maintained incorrectly. This guide outlines professional best practices for ESD flooring installation and maintenance to ensure long-term compliance with ANSI/ESD S20.20 and other industry standards.
Table of Contents
Pre-Installation Planning: Setting the Stage for Success
Proper preparation is essential before installing ESD flooring:
– Conduct a thorough site assessment of subfloor conditions
– Verify humidity and temperature levels meet manufacturer specifications
– Ensure all grounding infrastructure is properly designed
– Select appropriate adhesives based on flooring material and subfloor type
Subfloor Preparation: The Foundation of Performance
Subfloor Preparation and Installation for ESD Flooring
Before installing any ESD flooring, it’s critical to ensure the subfloor is properly prepared, as improper preparation can lead to adhesion failure, increased wear, or compromised conductivity. Here’s how to do it right:
Subfloor Preparation Checklist
- Clean and Level the Surface
Ensure the subfloor is flat with no more than a 3mm deviation over a 3-meter span. Use leveling compounds if needed to correct any dips or humps. - Remove All Contaminants
Eliminate dust, oils, waxes, adhesives, and curing agents that could interfere with flooring adhesion. A clean subfloor is crucial for proper bonding and ESD conductivity. - Moisture Testing
Check the moisture content of the subfloor using industry-approved methods. Excessive moisture can lead to bubbling or de-lamination. Make sure it complies with the flooring manufacturer’s specs. - Apply Primers When Necessary
Some ESD flooring systems require a primer or grounding layer to be applied before the main flooring is installed. Always follow the material-specific guidelines.
These subfloor preparation techniques are not unlike the critical prep work needed in home improvement projects like roof inspection in Raleigh, NC—where overlooking the base condition (in that case, your roof deck or underlayment) can lead to major performance issues later.
Proper Installation Techniques for ESD Flooring Types
Different ESD flooring materials require specific installation methods to ensure both electrical performance and durability:
- Vinyl Tiles or Sheets: Use conductive adhesives and roll the surface post-installation to remove air pockets.
- Epoxy or Urethane Coatings: Mix according to manufacturer instructions and apply in even coats using squeegees or rollers. Allow for proper curing.
- Rubber Flooring: Often requires specialized adhesives and must be rolled immediately after laying to ensure contact with the subfloor.
- Interlocking Tiles: Ideal for temporary or modular setups. Make sure grounding points are installed per the grounding scheme.
Correct installation techniques ensure that the floor maintains its ESD performance throughout its life cycle and prevents damage from wear or environmental exposure.
ESD Vinyl Installation
– Use notched trowels for proper adhesive application
– Maintain proper seam spacing and welding techniques
– Implement rolling procedures to ensure full adhesive contact
Epoxy/Polyurethane Coating Application
– Follow strict mixing ratios for multi-component systems
– Maintain proper environmental conditions during curing
– Apply recommended number of coats with proper drying times
Conductive Tile Systems
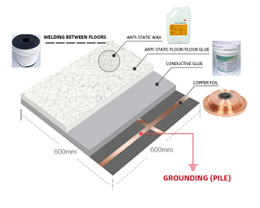
– Install copper grounding strips according to design
– Verify proper bonding between tiles and grounding system
– Use conductive grout for tile systems when specified
Grounding System Implementation
An effective grounding system is critical for ESD flooring performance:
– Install copper grounding strips or meshes as specified
– Ensure proper connection to building ground
– Test all ground connections with a low-resistance ohmmeter
– Document all grounding points for future reference
Post-Installation Testing and Verification
Before putting the floor into service:
– Conduct surface resistance testing per ASTM F150
– Verify resistance to ground meets ANSI/ESD S20.20 requirements
– Document all test results for compliance records
– Address any areas that fail to meet specifications
Routine Maintenance Procedures
Proper maintenance preserves ESD performance:
Daily Cleaning Protocols
– Use only approved ESD floor cleaners
– Avoid waxes, silicones, and other insulating coatings
– Implement proper mopping techniques to prevent residue buildup
Periodic Deep Cleaning
– Schedule quarterly deep cleaning with specialized equipment
– Strip and recoat urethane systems as needed
– Rejuvenate vinyl surfaces with manufacturer-approved treatments
Also read this: The Rise of Laser Welding in Canada’s Automotive Sector
Regular Performance Testing
Ongoing verification ensures continued compliance:
– Conduct quarterly resistance testing
– Monitor for wear patterns that may affect performance
– Document all test results for audit purposes
– Implement corrective actions for any failing areas
Repair and Refurbishment Strategies
Address damage promptly to maintain protection:
– Develop procedures for spot repairs of damaged areas
– Maintain inventory of matching materials for repairs
– Schedule complete refurbishment based on wear patterns
– Retest all repaired areas before returning to service
Training for Maintenance Personnel
Proper training ensures correct handling:
– Educate staff on ESD principles and risks
– Train on proper cleaning techniques and products
– Establish clear reporting procedures for floor damage
– Conduct annual refresher training sessions
Documentation for Compliance Audits
Maintain comprehensive records:
– Keep installation specifications and test results
– Document all maintenance activities
– Record all repairs and retesting
– Maintain training records for personnel
Conclusion: A Systematic Approach to ESD Flooring Management
Proper installation and maintenance of ESD flooring requires a systematic approach that begins with careful planning and continues through the entire lifecycle of the floor. By implementing these best practices, facilities can ensure their ESD flooring continues to provide reliable static protection while maintaining compliance with industry standards.
Final Recommendation: Consider implementing a computerized maintenance management system (CMMS) to track all ESD flooring maintenance activities and testing results for improved compliance management.


